How to Configure Scheduled Refresh in Microsoft Power BI
Learn the step-by-step process to configure scheduled refresh in Microsoft Power BI. Keep your reports current and enhance your data analysis capabilities.
Table of Content
With Microsoft Power BI, you get a platform that integrates with any data source you need, enabling you to create and share intuitive and visually appealing reports and dashboards that can revolutionize the way your organization uses data. What’s more, Power BI keeps your reports up-to-date by managing the connections from your data sources to the published datasets on the Power BI service.
In this blog post, I’m going to explain how to set up and manage a scheduled refresh plan to ensure that once you publish to the service, your reports stay up-to-date.
Once you have your dataset published to a workspace on App.PowerBI.com, you can set up a scheduled refresh plan by clicking on the menu button on the left pane when you hover over the desired dataset. Or you can access this window by clicking the scheduled refresh icon under actions on the Datasets tab for your workspace.

You can also get to your dataset settings by clicking the gear icon at the top of the page > settings > then the Datasets tab.

Once you get to the Datasets settings page, you can start to configure your refresh plan.
If your data sources are in the cloud, you can skip this step and continue to the “Data Source Credentials” section.
If you’re using a data source located on-premises, you’ll need to set up a data gateway. Data gateways are essentially mechanisms that enable secure data transfer to the Power BI service from your data source. Since Power BI is a cloud service, these gateways are necessary to get the data from your environment to the cloud.
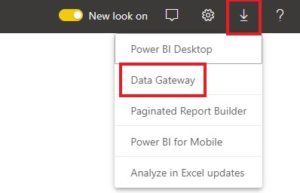
To get started, you’ll need to download and install the gateway. You can get to the installer by clicking on the Download icon at the top of the page, and then Data Gateway.
Once you download the installer, you’ll be prompted to choose between enterprise and personal mode. It’s recommended to use enterprise gateways when you need an environment that supports multiple developers or in any scenario where Power BI needs to be used in conjunction with other applications. You can still use personal mode to refresh reports and share with multiple users, which may be desirable if a single analyst only needs to publish, refresh, and share. Some other notes about personal mode:
If choosing personal mode, you don’t need to worry about registering your gateway or any of the configuration steps. For enterprise, you should install your gateway on a machine in the on-premises data source domain (the machine should always be up and running) and register the gateway with the email used for your Power BI account. Be sure to keep your recovery key in a safe place so that you can make changes later if needed.
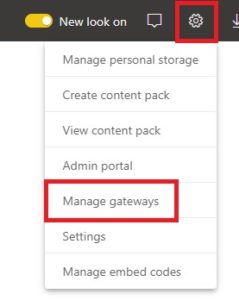
Now that you’ve installed and registered your gateway, you need to add your data source. On the Power BI Service, click on the gear icon at the top of the page, then Manage gateways.
Select the gateway that you installed and click on Add Data Source. This is where you will enter the path to your data source and the data source credentials. If everything is entered correctly, a “Connection Successful” message should appear. Repeat this process if you have multiple data sources.
Now that your gateway is connected to the data source, the last step is to connect your gateway to the dataset in the Power BI Service. Return to the datasets settings page by clicking on the gear icon > settings > and the Datasets tab. Select the dataset that you want to connect, click the dropdown for gateway connection, and select the gateway that you just configured. You can test your gateway configuration by manually refreshing your dataset.
Regardless of if your data source is on-premises or in the cloud, you’ll need to make sure that you have your data source credentials entered on the Datasets Settings page. To do this, select the Data Source Credentials dropdown and ensure that there are no errors with any of the listed data sources. If there are any issues with your credentials, you should see a message like this:
![]()
You can edit your credentials by clicking on the edit credentials dialog for each data source.
Now that you’ve configured all the right connections and credentials, you’re ready to set your refresh schedule. On the Datasets Settings page, under the Scheduled Refresh dropdown, flip the switch under “Keep your data up to date” to the on position. Once you flip that switch, you can set up whichever times and frequencies you choose (up to 8 times per day for pro licenses or 48 times per day for premium). Check the box for refresh failure notifications, add any other users’ emails who need to be notified. Then, hit Apply.
Setting up scheduled refresh is an easy way to maximize your reporting effectiveness. Utilizing dynamic reports in Power BI empowers you to spend more time generating actionable insights from your data and less time on manual reporting. Learn more by downloading our guide to Better Business Analytics.
Talk to us about how Velosio can help you realize business value faster with end-to-end solutions and cloud services.