Custom Financial Reports for NetSuite OneWorld: Trial Balance by Subsidiary
Nicole Watson||
Learn step-by-step how to create a Trial Balance Report by subsidiary in NetSuite OneWorld. Master the financial report builder to customize and modify reports.
Table of Content
SHARE
SHARE
Clients frequently request the ability to see a Trial Balance Report in NetSuite OneWorld at a consolidated level showing their subsidiary hierarchy by column. Since the Trial Balance currently doesn’t allow a column context, we recommend creating a custom financial report by following the steps below.
(Note: the menu paths in this article follow the Classic Center)
Step 1: Creating a new report using the NetSuite financial report builder
Go to Reports > New Financial Report then select the ‘Standard Balance Sheet Layout’
Rename the name of the report that makes most sense to you when running the report after creation
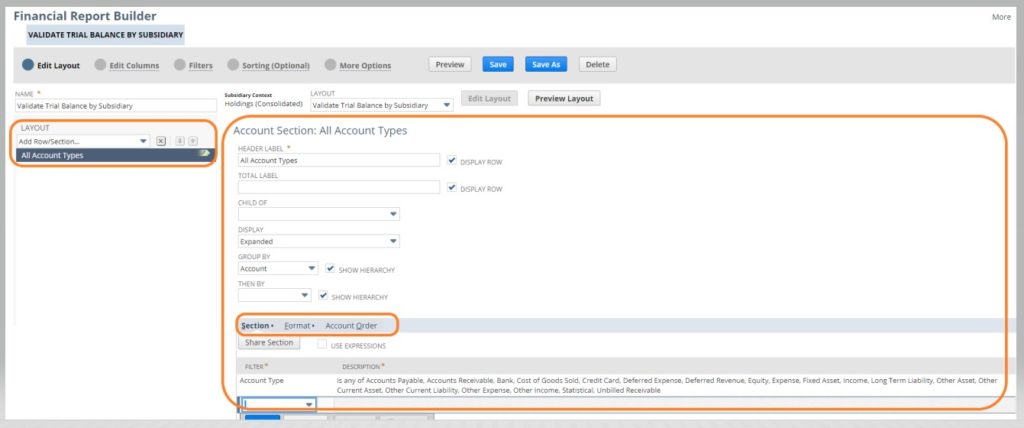
Delete all the sections, then add one Financial Section as follows:
In this example, I changed the Header Label to “All Account Types” based on my section filter
Under Section, select the filter for ‘Account Type’, then select all of the account types
Under Format, you can modify whether the section indicates balances as positive or negative (depending on the natural balance in the account type) by checking or unchecking the ‘Reverse Sign’ boxes.
Under Account Order, change the ‘Order By’ field to ‘Account Number Ascending’ or the sorting preference of your choice
Under Edit Columns
You can add additional columns as you desire/require here
Under More Options
You may want to change the Audience or Access to the report so other users can view/access the report
Once you have completed the steps above, click ‘Save’ to save the report. You can always go back in to adjust the report for any other requirements by returning to the customization.
Step 3: Rename the Row Layout
Rename the Row Layout and Apply the Row Layout to other subsidiaries in your OneWorld environment. The purpose of this step is to ensure that when you run the custom NetSuite report, regardless of subsidiary context filter, you see the same row layout.
Rename the Row Layout
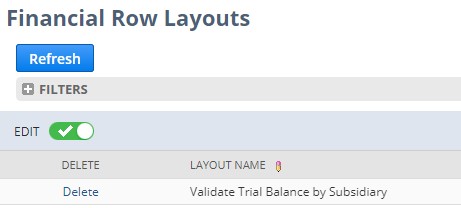
Go to Reports > Financial> Financial Row Layouts
Turn on the in-line ‘EDIT’ mode (you will know it is on when you see the green button with the check-mark and a pencil next to ‘Layout Name’)
Change the name of the Row Layout you created (it will likely say something like “Custom Balance Sheet Layout”) by clicking on the name of the layout. In this example, I renamed the layout to “Validate Trial Balance by Subsidiary”
Assign the Row Layout to Other Subsidiaries
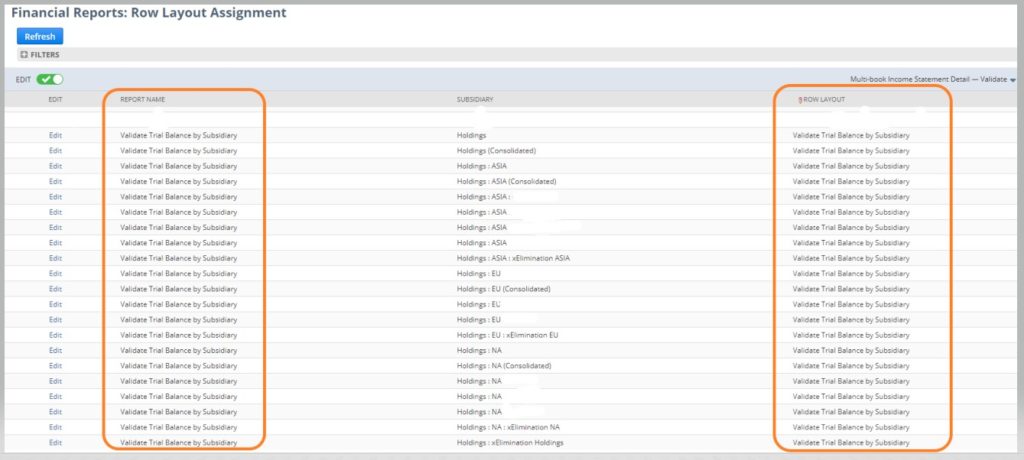
Go to Reports > Financial > Row Layout Assignments
Turn on the in-line ‘EDIT’ mode (you will know it is on when you see the green button with the checkmark and a pencil next to ‘Row Layout’)
Find the name of the report you created. In this example, it is “Validate Trial Balance by Subsidiary”, which coincidentally is the same name we gave the row layout.
Change the name of the Row Layout by clicking on the row layout drop-down for each subsidiary by selecting the name you provided when renaming the row layout. In this example, I selected “Validate Trial Balance by Subsidiary” for each subsidiary.
Congratulations, you should now have a Trial Balance by Subsidiary custom financial report successfully running in your NetSuite environment.