Multiple Subsidiaries, Multiple Logos: The NetSuite Advanced PDF/HTML Template Solution

Do you need to print a subsidiary-specific logo for transactions rather than a corporate logo? Use the NetSuite advanced PDF/HTML template.

Table of Content


    Do your subsidiaries have different logos? Do you need to print a subsidiary-specific logo for transactions, like customer invoices, credit memos and vendor purchase orders, rather than your corporate logo within your NetSuite environment? Here are the steps to make it happen:

    Step 1: Add the subsidiary logo in the subsidiary setup

    1. Go to a list of subsidiaries by navigating to Setup > Company > Subsidiaries
    2. Click ‘Edit’ next to each subsidiary to add a subsidiary-specific logo to the setup
    3. In the Subsidiary Logo (Forms) drop-down box, choose the appropriate logo that corresponds with that subsidiary.Note: If the logo doesn’t appear in the drop-down box, you will need to upload the logo image to the File Cabinet first.
    4. Click the ‘Save’ button on the Subsidiary record.

    Step 2: Customize your NetSuite advanced PDF/HTML template

    1. Navigate to Customization > Forms > Advanced PDF/HTML Templates
    2. Click ‘Customize’ next to the Standard Invoice PDF/HTML Template – or ‘edit’ your own customized template if you already have one.
    3. Click the switch for ‘Source Code’ on. This will prompt you to leave the WYSIWYG editor and view the source code.
      • You will receive a warning popup box. Please read the warning carefully, then click the ‘YES’ button to continue.
    NetSuite advanced PDF HTML templates

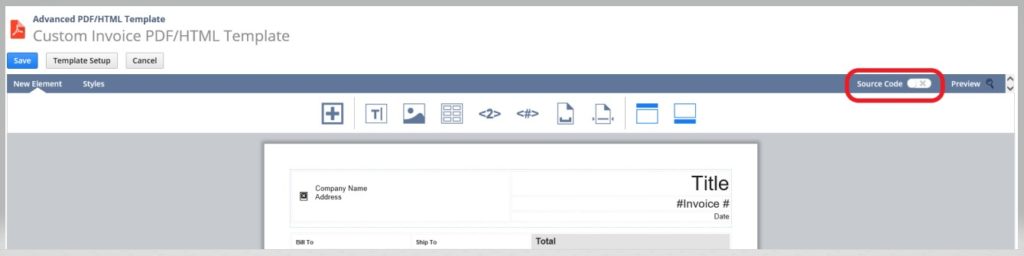
    You should now be viewing the source code, which should look similar to this:

    NetSuite advanced PDF template

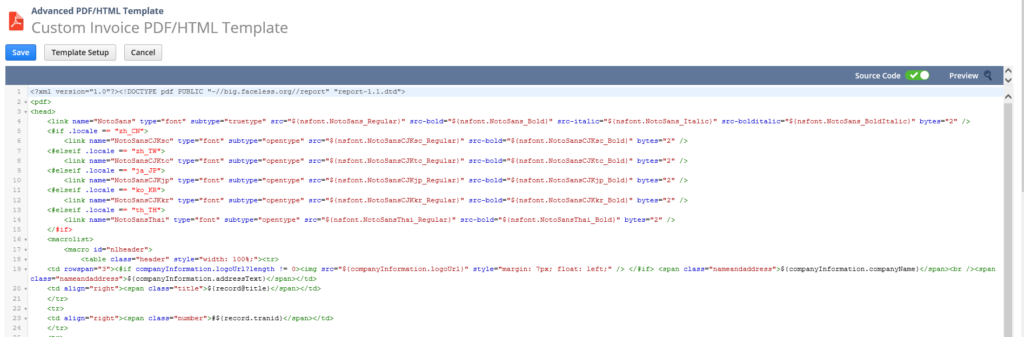
    Notice Row 19 from above, where it states “…<img src=”${companyInformation.logoUrl}…”, you will want to change the {companyInformation.logoURL} to {subsidiary.logo@Url}.

    5. Click the ‘Save’ button on the template.

    Step 3: Verify that the transaction form is set to use the customized advanced PDF/HTML template

    1. Navigate to Customization > Forms > Transaction Forms
    2. Click ‘Customize’ next to the Standard Client Invoice – or click ‘Edit’ next to your own customized transaction form if you already have one.
    3. Ensure the ‘Printing Type’ radial for ‘Advanced’ is marked.
    4. Verify the ‘Print Template’ and the ‘Email template’ drop-down boxes are pointing to the customized Advanced PDF/HTML template created in Step 2 above.
    5. Click the ‘Save’ button on the transaction form.

    Verifying the NetSuite advanced PDF template

    After you have completed the third step, you should verify that the Invoice PDF/HTML output meets your business needs.

    You can do this by navigating to an Invoice transaction record in View mode, then click the printer icon. This will open the Advanced PDF/HTML version of the Invoice, which should display the subsidiary logo instead of the corporate logo. If you need to re-size the logo, you can adjust the size by going back into the customized template’s ‘source code’.

    Need help customizing your solution further? Contact our NetSuite consultants today.