6 Steps to Close The Financial Year Using Microsoft Dynamics 365 Business Central
Follow these steps to close the financial year and prepare for processing transactions in Microsoft Dynamics 365 Business Central.
Table of Contents
You have reached the end of your fiscal or calendar year, and it’s time to close the accounting period in Microsoft Dynamics 365 Business Central. At least 12 months have passed since you last performed this process, and perhaps this is the first time you are completing these steps within Dynamics 365. You may have some questions, such as:
This blog article provides an overview of six steps you can take to prepare for processing transactions for the new year.
First, it is important to confirm that all transactions at the sub-ledger (AP, AR, Bank, Fixed Asset, etc.) posted. Then, ensure you have posted any General Ledger (GL) General Journals. Once confirmed, generate a GL Trial Balance (TB) Report for the last day of the year. Use the various filtering options to focus on a specific Dimension such as Fund, Department, or Division during your review of the TB Report. This step is often overlooked and will significantly speed your review of the report for accuracy. Retain a copy of the GL TB for comparison after the close.
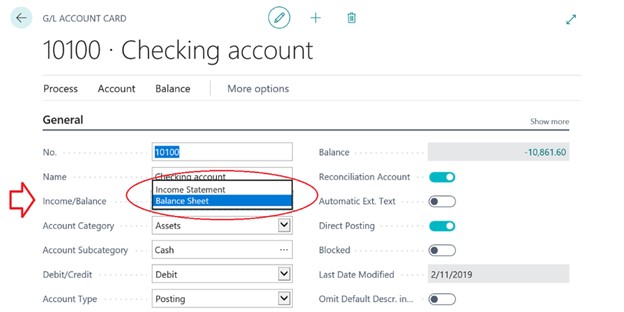
Perform a quick review of how your GL Chart of Accounts (CoA) are set up, especially in relation to your Account Numbers and to either a “Balance Sheet” or “Income Statement” account type. This process can be performed by simply accessing the GL CoAs and opting to export the listing to Excel. Once in Excel, perform a review by either scanning the records or filtering to isolate the different accounts. If you locate one that is misaligned, make the changes in Dynamics 365. This step will eliminate extra work later—in the event an account is set up incorrectly and takes less than 10 minutes to perform.
Like the process you followed for step one, generate the balance sheet and profit/loss (P&L) or income/expense (I&E) statement and review for accuracy. Once you complete the year-end close, you should generate the same financial statements for the new year (with a date of 1/1/XX for a calendar year or 7/1/XX for a June fiscal year end). Ensure the balances roll over correctly in the balance sheet and clear out in the P&L or I&E report. If you retain a balance in a P&L or I&E GL account, research the GL Account and ensure it’s set up appropriately as an Income Statement. At this stage you will become a follower of the GL CoA review noted above.
Most likely this step already has been accomplished, given most companies don’t close precisely on the day after the year end. Often companies continue posting transactions in the new year, so proceed with creating the new year ahead of hitting the specific date in time (such as 12/31/XX or 6/30/XX). Next, choose “Create Year” in the accounting periods window menu as noted with the red arrow below.
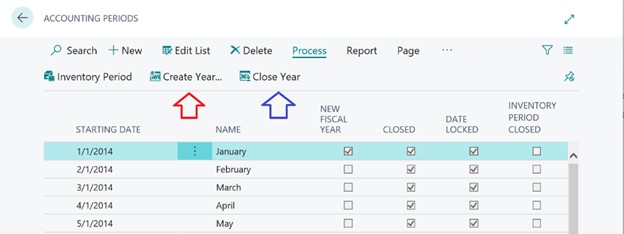
Now you are ready to select “Close Year” as noted by the blue arrow above.
When closing the year, verify the right year is included in the message (see below). If correct, select “Yes.” If not correct, select “No” and review the last closed period for accuracy. Someone may have overlooked closing the prior year, which must be performed first.
Closing the Year marks the year and periods as closed, but you will continue with step four to roll the Income Statement activity over to the Balance Sheet.
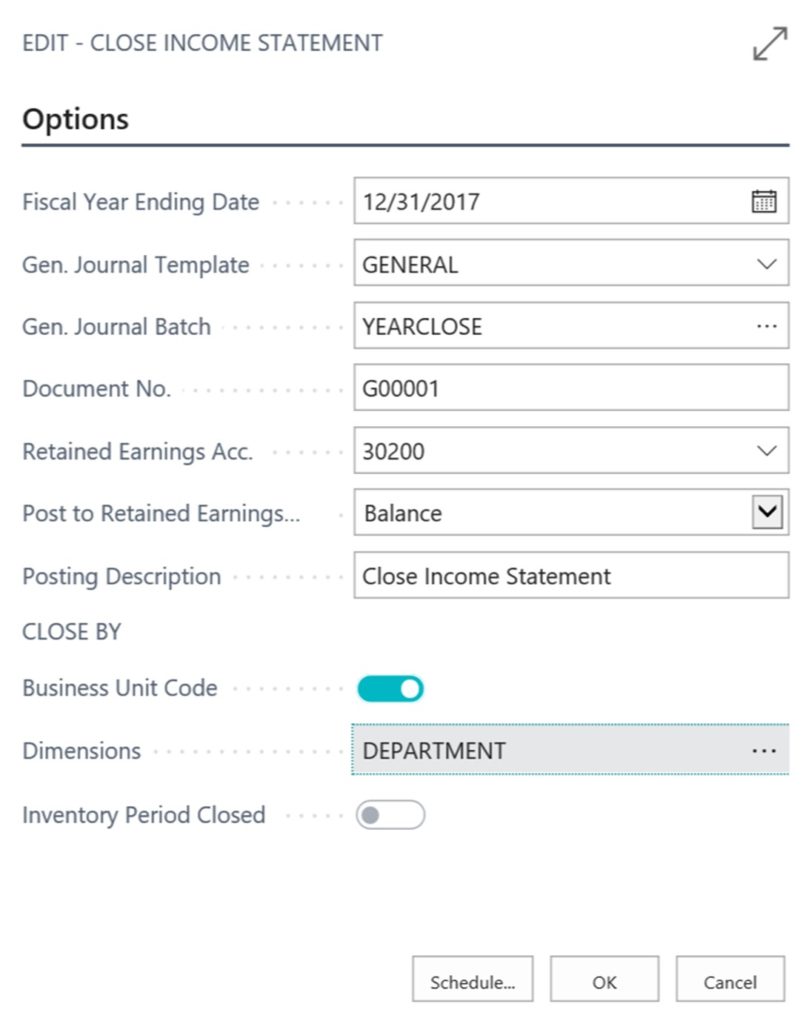
While in Dynamics 365, perform a search for “Income Statement Close” and continue with these tasks for your company. Select “General Journal” and the “Year End Close” Batch that you use on an annual basis to manage the Closing Entries. If this is your first time performing a Dynamics 365 close, then it is recommended that you set up a “YEARCLOSE” or “YEAREND” General Journal batch. This helps to track the entries as part of the year end close process—separate from the standard monthly journals.
You have the option to close at the Business Unit level (Division, Department, etc.). To close the balances, select from the different dimensions as required and click “OK.” At completion, a journal entry will be created in the Year End Close Batch noted above. Ensure the entry reflects the recently completed year end and opt to post the closing journal entry. At this point, you are nearly done with the process.
As eluded to in Step Two, your next task is to ensure the accuracy of the new year GL Account Balances before your users actively enter transactions and post records in the new year. Generate the GL TB Report again and confirm the beginning balances are zero for the first day of the new year. Each balance sheet account will include a roll over balance, but the P&L or I&E accounts will be zeroed out as of the first day of the new year. This is an important point since you may already have posted transactions for the new year. If so, it is critical to select only the first day of the new year when generating the GL TB Report for reviewing the beginning balances. If you find any accounts with an incorrect beginning balance, research the records and make appropriate adjustments prior to finalizing the year close. If the accounts are correct, continue with Step Six below.
Here again, it’s most likely been some time since you set up the GL and Users. However, there are date sensitive fields on the GL & User setup windows respectively. Therefore, revisit the GL to ensure the GL settings for “Allow Posting From” and “Allow Posting To” reflect the new year. Confirm no dates are selected or select the new accounting period date range.
Next, revisit the User Setup and select the “Allow From” and “Allow To” periods that relate to the new year.
When you have completed the above steps and successfully closed out the prior accounting period, your users can continue processing transactions for the new year.
During the close-out process, you may locate a transaction that needs to be included in the prior year. If this is the case, enter the current-year transaction and complete the following:
While the above is a highly summarized overview of the steps related to your year-end close process in Dynamics 365, you may find you need extra guidance. As a Microsoft Gold-Certified partner & Cloud Solution Provider (CSP), Velosio has dedicated staff and resources to support you.
Talk to us about how Velosio can help you realize business value faster with end-to-end solutions and cloud services.