Advanced Vendor Collaboration and Vendor Onboarding in Dynamics 365 For Finance and Operations, Enterprise Edition
Dynamics 365 for Finance and Operations has much more to offer to automate vendor onboarding in Dynamics 365. Learn more today!
Table of Content
In one of my earlier posts, I elaborated some of the functionalities of the vendor collaboration/vendor self-service feature of Microsoft Dynamics 365 for Finance and Operations – Enterprise Edition and what was coming in future releases. With the Fall release (Version 7.3), Dynamics 365 for Finance and Operations has much more to offer to automate vendor self-service and collaboration, specifically around the vendor user and organization onboarding aspects. In this post, lets take a look at some of those new features, specifically related to vendor onboarding in Dynamics 365.
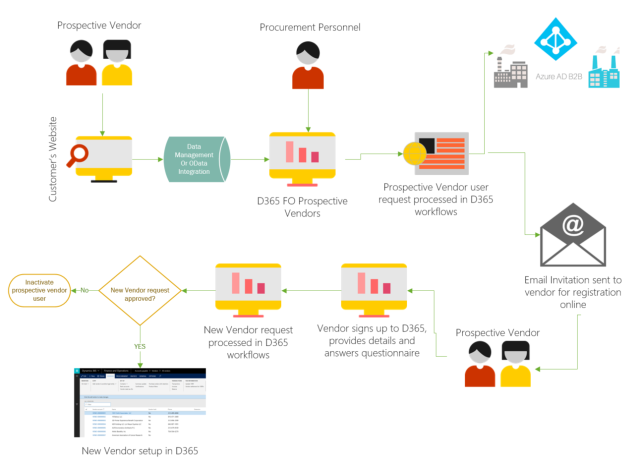
The diagram below shows an overall representation of how the data flows from a prospective vendor to an approved vendor in D365FO.
Let’s now dig into some of the finer details of the processes.

Before an organization or individual wants to become a vendor for your organization, they are referred as “Prospective Vendors”. They can apply to be a vendor for your organization either via a website you may have, with anonymous access, or they can apply via a contact at your organization. If they come in through your website, you can have an OData integration with D365FO to send the prospective vendor’s data into D365FO.

Alternately, you can also use Data Management Framework to import the prospective vendor data periodically into D365FO.

After the initial basic data for the perspective vendor comes into D365, it will appear in Prospective Vendor registration under Procurement & Sourcing > Vendor collaboration requests.

Before a procurement personnel from your organization reviews the requests to initiate vendor onboarding in Dynamics 365, a workflow should be set up behind the scenes to do all the heavy lifting.
Under System Administration > Workflow > User Workflows, you can set up workflows for adding, modifying or inactivation of a new prospective vendor/existing vendor user. For a new prospective vendor user, the workflow provides various options to fully control the new user provisioning in Azure AD and new user creation in D365FO.
Take a look at the screenshot below which shows this workflow.

 To initiate the invitation process for the new prospective vendor, the procurement personnel will select the required user and review the details. If they decide to proceed with initiating the invitation process, they click the Invite User button.
At this point, the processing status of the vendor registration request changes to “User requested“. This means a request for setting up a new user account in Azure AD and in D365FO has been initiated in the workflow.

As soon as the user creation request is creation, the personnel setup in the workflow for this will get notified and will process the request further. If you notice the screenshot of the workflow above, the first step in our workflow is to review and approve the user request before the Azure AD and D365FO user accounts are created.
The personnel responsible goes into the user request and reviews the details to approve it.

The next step in the workflow is to set up the B2B user account in Azure AD. You can use the manual task within the workflow and assign it to the required person, who then can download the external user setup CSV file for import within Azure AD.

Alternately, you can use the automated task for provisioning the Azure AD B2B user account. If you chose to use the automated task, you need to make sure to complete the below setups.

With the above setup done, the automated task will provision the Azure AD user for the vendor user automatically. In the next step of the user setup workflow, you can set up automated tasks for provisioning the user account within D365FO and also send the email notification to the vendor with a URL link to D365 for signup and registration. You can set up an email template and use (%portalURL%) placeholder in the email message, which will automatically include the URL of D365FO, when it sends the email notification to the vendor.
In this demo, the prospective vendor I added was John Smith whose email ID was schaudhury@velosio.com. Since all of the steps above were completed, ( (John Smith, the vendor) got the email notification with a URL for sign up.

Now, it is time for the prospective vendor to sign up, complete the registration wizard and provide additional information about their organization.
When the vendor logs in to D365 by clicking the URL in the email invite, they are taken directly to a registration wizard, which appears as shown in screenshot below.

The vendor selects the Country/region first in which they operate in. In this case , I selected USA.

On the next few screens, vendor enters their business information and all necessary details as shown in screenshots below.


You can also configure and assign predefined questionnaire and assign it to the vendor to answer.
When done, the vendor submits all the information at the end of the wizard.
This creates the new vendor request in D365FO, which will then be reviewed and approved by a procurement or AP person of your organization. Procurement personnel can navigate to Procurement and Sourcing > Vendor collaboration > Vendor requests to see these.


The Procurement personnel then completes the review process of the new vendor request and upon confirmation, the new vendor record is automatically setup in the Vendor master. After that, the vendor can have full access to the vendor collaboration portal and they can communicate with your organization in real time on purchase orders, invoices, consignment inventory, RFQs and responses, bidding and more.

You don’t have to do this alone. Learn how Velosio can help you achieve your organizations goals as an ISV Partner.
About Sandeep Chaudhury
Sandeep Chaudhury is a Dynamics AX enthusiast with over 10 years of experience in functional consulting, Solutions architecture and systems integration, with expertise in the areas of Professional services automation(Project Management and accounting), Financials Management, Services Management, Sales and Marketing, Human resource management, Travel and Expenses Management and Procurement & Sourcing modules of Microsoft dynamics AX ERP. He has experience working with the new Dynamics AX (AX 7), AX 2012 R3, AX 2012 R2 and more.
Talk to us about how Velosio can help you realize business value faster with end-to-end solutions and cloud services.


